Thursday 29 October 2009

Alternate Print Dress and Top


I realised I forgot to blog about this one.
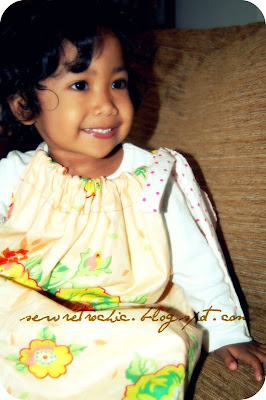
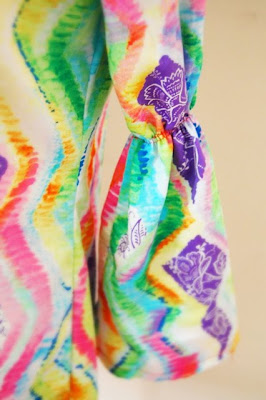
Simple peasant style (again) top for Aisha and dress for Hanan. The fabric is very lightweight cotton purchased locally. The pattern again from CarlaC called Molly from YouCanMakeThis.com.

This style has a tapered/shapy hips which makes it a bit more fitted. It also has elastic threaded at the waist. Since the cotton is very thin and comfy, both the girls prefer to wear this to sleep on warm nights.
Aisha in particular love it so much she'd wear it every other night. It's good that the clothing I make for them gets a good amount of wearing and washing before they outgrow it.

The view from the back of the dress & top

Wednesday 28 October 2009

A Week Without The World Wide Web


I felt lost..and empty...I missed this space horribly! Shows how much addicted I am to the Cybersphere.


I was up north in Penang for 1 whole week, attending a Nation Building Camp (BTN), a compulsory course for government scholarship holders pursuing their studies overseas next year. I'm going to Perth, Australia next July for my Masters, and was told to attend this course.

The camp is in Balik Pulau, Penang. I actually drove alone for 5 hours to reach the camp! It was a last minute change of plan as hubby had to attend an urgent meeting. I was a bit nervous about travelling alone, I chanted "I'm a smart woman, I can do this" the whole journey lol


It was overall enjoyable. I learned to adapt. It was a packed course and the place do not have mobile phone coverage let alone Internet connection. My heart yearned for my babies all the time. I managed to take a few shots (from my hand phone's camera) of the beautiful beach and hill side jungle during our hiking/jungle trekking exercise.


Breathtaking views.....Malaysia is indeed a beautiful country, and I'm so proud to be Malaysian! I love this country so much...

Now, so happy to be home, can't wait for the weekend to start sewing again. Cheers!

Monday 19 October 2009

Adore Me! - Baby Iman in Kimono PJs


Presenting baby Iman in the Kimono Pjs I made for him.

Just look at him!! How precious! I feel like reaching out and pinching those chubby cheeks! So happy the pjs fit him. Oh, and my colleague said too nice to sleep in, these are his pictures taken before a family outing. Looks like I will definitely make more handmade gifts! :)

Sunday 18 October 2009

Ruffled Peasant Tops


The weekend usually is very productive for me as I have the time to sit down and sew. Saturday morning I finished sewing these two tops for my girls just in time for us to go for lunch party at a friend's house.


hanan walking2
hanan sweet smile

The pattern here is Portrait Peasant by CarlaC on YouCanMakeThis.com. Love all her patterns. Super easy and clear pictures to guide me along. I chose the simple tops with added ruffles design option. I had fun sewing this using Patty Young Fabrics from her Andalucia Collection (except for the polkadot print). The girls are happy too.


Sunday (today) is a different story though. I fell sick again. Just feel like lying down all day. I've a few more unfinished craft projects. Next weekend will not be crafting as I'm going for a 5 days course in Penang. Sighhh....am gonna miss my babies so much...

Till then, enjoy the rest of the weekend! :)

Thursday 15 October 2009

Amy Butler’s Kimono Style PJs - Gift For Baby Iman

kimono pj1
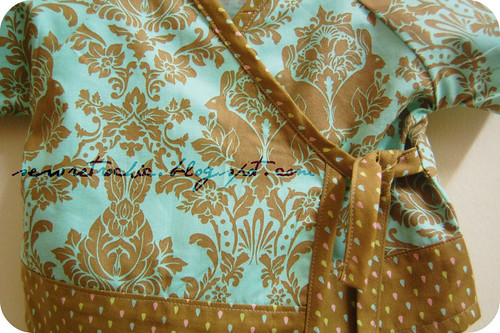
I finished making a handmade Kimono PJs as a gift for a colleague's new baby boy, Iman. I'm a bit late as he's already 2 months old now.

This is a pattern from Amy Butler's pattern book Little Stitches for Little Ones, the Kimono Style PJ. I used the 3-6 months size as my colleague said his baby has already outgrown newborn size. The fabric is beautiful, whimsical baby print from the Hushabye Colection by Tula Pink. This is the closest boy print I could find in my stash. There's still some hints of pinks in it J

The construction of this PJ is fairly easy. I know my way around most of it even when the book does not have many pictures in the sewing instructions (lots of beautiful final product pictures though). The hardest part for me was the bias binding. I think I've missed the "single fold" part and prepared a double fold bias. I ended up having a narrower bias trim. Other than that, the whole experience of sewing this special kimono pj was beautiful......
kimono pj2
.....because I've yearned for a baby boy since forever....after two girls (which I adore and wouldn't change for anything), I dream of a little boy to cherish and to love. I actually went to hubby after finishing this kimono, and whispered that I want a baby boy. He looked at me, smiled, kissed my forehead and basically stayed away from me the whole night LOL!

So for now, this special handmade gift will go to baby Iman. Hope it will fit him and I've asked my friend to take a picture of him in it (coz I have not seen him personally) and perhaps I could feature him here.

kimono pj gift
Off to find its new owner. Fabric card I made up from my fabric scraps.

Tuesday 13 October 2009

Pencil Case for Aisha


Hi there! How are you? I had a rough Monday and still feeling sickly today. This post is to lift my spirit up.

Made this during the weekend. A pencil case for Aisha as the one she had went kaput. I used this super clear tutorial. It turned out a bit small, it will make a perfect cosmetic pouch for me actually. But the result is so cute, I beamed the whole time admiring it. Note that this is actually my first zipper, not difficult at all.

Aisha loves it but already asking for a bigger one to stuff all her colour pencils. I think a heavier cotton canvas would hold the boxy shape better. Will make this again soon, promise!


I lined the case with cute brown dots cotton fabric. I used fusible interfacing instead of the sewn in one as indicated in the tute.


Hmmm...mission accomplished! Time for a cuppa (and some aspirin, ouch..)!

Sunday 11 October 2009

Sew It - Simple Sundress and Top


Done it! I joined the Sew It - a sew along organised by lovely Mayya at Sew Chic and Unique when I saw they are sewing this simple sundress, an online tutorial over at Habitual.


I've seen this tute before but never got around to sewing it. So, this sew along is a great motivator for me to create. And of course, as I found out the best way to get Hanan to wear what I sew for her is by sewing identical garments for her sister, I made two! She gets really excited now and pestered her sister to put on the dress quickly and had a big smile when both of them walk hand in hand.

Aisha wears everything with jeans and not very keen of dresses. So I made this as a top for her. Fabric is Heather Bailey's Pop Garden - a bright red essence for Aisha and a softer peachy one for Hanan. I love this collection so much...


Sewed both dress & top for 2 hours. Really simple, pillowcase-style construction. The armhole was quite large so both my daughters wanted the t-shirt inside. Seen here at their grandparents house for a lunch party.


And this little cupcake always warms her mommy's heart with that smile :)

Tuesday 6 October 2009

A Peasant Blouse for Myself


This one is made from the pattern I won in the giveaway by Denise from Whimsy Couture. I loooove the result. First time sewing my own garment and it's so gratifying!


What I love about Denise's pattern is her cutout method, which is brilliant! Saves so much pasting-pattern-pieces and cutting time. I made this one in size L (yes, I'm that size *sigh*) and fits me nicely. Oh, I have to mention, the tailoring strip trick is amazing! It gives the blouse a shapely curve, exactly how I like my clothes to be. The only thing I change when sewing this is I shirred the neckline instead of threading elastic. I also made it longer to fall mid thigh, a bit more tunic-like.


The only thing I'd like to change is the contrasting thread. I should have used a matching coloured one, but I'm just plain lazy here. The fabric here is locally purchased lightweight cotton. It's a bit busy for my taste. But I like it anyway. Mama mia!
peasant blouse2

Sunday 4 October 2009

The Shirred Mod Top Sewing Tutorial

RetroTopAisha2

I am in no way a professional. Just sharing how I made a knock off version of a lovely design I saw at the mall. Experienced sewer would definitely do this in a better way and I'd love to learn from you. Things I learn from this project is that the design would be gorgeous on adults or bigger girls. My 2yo toddler put it on for 2 minutes and pulled on the neckline. I guess it is best to line the top with a soft cotton or voile if I want Hanan to wear this and also to reduce the number of shirring lines to make a shorter mock turtleneck.

I am also not very good with standard sewing terms (hem, edge, stitch, seam etc). And I got ahead of my camera a few times and forgot to take photos, so I try to make it up with some very dodgy doodling. Please forgive me in advance.

Here we go!

  1. Choose your fabric. The one I saw at the mall was silk chiffon and fully lined. Real flowy and gorgeous. I can only sew with cotton for my girls, so I tried using both medium weight quilting cotton and soft lightweight cotton lawn. The result – so much better on lightweight cotton.

  2. Taking measurement. Measure from left to right armpit. The rule of thumb here is the width should be twice as long as that. So if the measurement is 9", the width of the fabric is 18". This is not exact science, it allows for a few inches more. When I'm lazy, I just fold a 44" wide fabric into half and cut two pieces of 22" wide fabric J

  3. Decide the length you want (either a top or dress) plus 2 inches neck edge & hem allowance and that will be the length of the fabric. For Aisha's top, I cut 2 pieces of rectangles measuring 22" x 24". You can serge or zigzag the sides of each rectangle at this stage to avoid fraying.


  4. Fold the top edge twice (up to you either ¼" or ½". The former would give you a thinner neckline curl after shirring). Here I'm using ½" so the curl is quite thick.


  5. Edge stitch the pressed fold from the wrong side of fabric.
  6. Now, turn the fabric on the right side. You can first draw straight lines using fade away fabric marker if you want. Here I just used the machine's presser foot as guide. The closer spaced the shirring rows is, the better. Notice I changed the foot to a slimmer one here as I want a smaller space for my shirring rows. Change the bobbin with hand wounded elastic thread. Start shirring, backstitching at beginning and the end.

    Note : If you're new to shirring, a nice tutorial is available here.
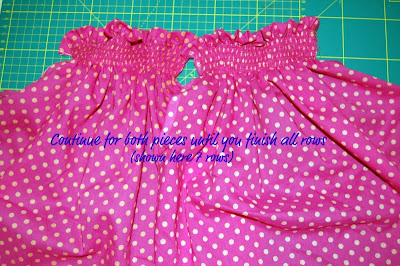
  7. The higher the number of rows, the higher the mock turtleneck will be. Here I did 7 rows (the one at the store was 10 (yes, I went in and counted lol)! But it was real tight, closely spaced shirring). As I said earlier, if you want a more relaxed neckline, reduce the number of shirring rows. Shirr both piece of rectangles and you'll get this :

  8. Pin both pieces, right sides together. Make a mark ½" away from the last shirring row as shown in the photo. Change the bobbin back to regular thread. Then zigzag stitch from top of fabric sides until the last shirring row. Do not extend your stitching beyond the last row. Do this to both left and right sides of the fabric.


  9. Caution, real bad drawing here lol. I forgot to take photo here. To create the armholes, snip 1/2" at the mark you made in previous step and cutout. To determine the length to cut, you could take measurement from existing clothes or just take the arm-shoulder circumference divided by 2. For Aisha and Hanan, I used standard 4.5" for a close fit. If this is to be worn with t-shirt underneath it should be at least 5". Just a slim curve will do.

    Note : It occurred to me that perhaps it is possible for this to be done before shirring the neckline. I've never tried it but if it works for you I'd love to hear it.
  10. Next, stitch narrow hem the armholes all the way round for both sides (the trickiest part for me, this stage).
  11. Align both sides, right sides together and sew the side seams. Press the seams open.

    12. Lastly, fold the hem 1/2" twice. Press and stitch close to the edge.

    13. Give the garment a final overall pressing, try it on and you're done!


With t-shirt inside...

I'd be really honoured if you'd try this tutorial and would love to see your version. Please email me anytime or drop a line in the comments. Thank you and hugs!!

I Won, I Won, I Won!

I can't believe my great luck today! I won a giveaway! And this is the first time I ever entered a giveaway! So happy!
You know about my love affair with sewing patterns? Basically, that is how I learn sewing. Nowadays, I'm addicted to ePatterns. With these convenient pdf format, I'll never lose them! So when I saw that Denise from Whimsy Couture was having an ePattern giveaway, I entered it. I purchased her patterns before and love them because her instructions are really clear and there are lots of pictures to guide you in the tutorial. I figured winning another ePattern would be great and I won, yeay! Now I need to find the time to sit down and sew them :D
I highly recommend Whimsy Couture if you want to try beautiful, easy to sew designs. Checkout her blog for more giveaways and promotions too. To Denise, thank you so much, you're the best!

Oh, did I mention that once again my daughter made it to Grosgrain? This time the picture from previous post.

I managed to put together a simple tutorial on the top. Made another one from soft, lightweight cotton (so much better drape). Please pardon my tardiness in putting up the tute, I am after all only free to play around with this hobby on weekends J I'll try to upload it tomorrow. Till then, enjoy your weekend!

Early morning photo, Aisha and her eyebags and wet hair from the shower J

LinkWithin

Related Posts with Thumbnails