

I am in no way a professional. Just sharing how I made a knock off version of a lovely design I saw at the mall. Experienced sewer would definitely do this in a better way and I'd love to learn from you. Things I learn from this project is that the design would be gorgeous on adults or bigger girls. My 2yo toddler put it on for 2 minutes and pulled on the neckline. I guess it is best to line the top with a soft cotton or voile if I want Hanan to wear this and also to reduce the number of shirring lines to make a shorter mock turtleneck.
I am also not very good with standard sewing terms (hem, edge, stitch, seam etc). And I got ahead of my camera a few times and forgot to take photos, so I try to make it up with some very dodgy doodling. Please forgive me in advance.
Here we go!
- Choose your fabric. The one I saw at the mall was silk chiffon and fully lined. Real flowy and gorgeous. I can only sew with cotton for my girls, so I tried using both medium weight quilting cotton and soft lightweight cotton lawn. The result – so much better on lightweight cotton.
- Taking measurement. Measure from left to right armpit. The rule of thumb here is the width should be twice as long as that. So if the measurement is 9", the width of the fabric is 18". This is not exact science, it allows for a few inches more. When I'm lazy, I just fold a 44" wide fabric into half and cut two pieces of 22" wide fabric J
- Decide the length you want (either a top or dress) plus 2 inches neck edge & hem allowance and that will be the length of the fabric. For Aisha's top, I cut 2 pieces of rectangles measuring 22" x 24". You can serge or zigzag the sides of each rectangle at this stage to avoid fraying.

- Fold the top edge twice (up to you either ¼" or ½". The former would give you a thinner neckline curl after shirring). Here I'm using ½" so the curl is quite thick.

- Edge stitch the pressed fold from the wrong side of fabric.

- Now, turn the fabric on the right side. You can first draw straight lines using fade away fabric marker if you want. Here I just used the machine's presser foot as guide. The closer spaced the shirring rows is, the better. Notice I changed the foot to a slimmer one here as I want a smaller space for my shirring rows. Change the bobbin with hand wounded elastic thread. Start shirring, backstitching at beginning and the end.
Note : If you're new to shirring, a nice tutorial is available here.

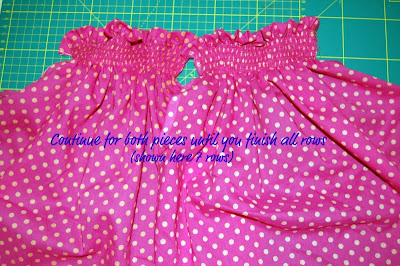
- The higher the number of rows, the higher the mock turtleneck will be. Here I did 7 rows (the one at the store was 10 (yes, I went in and counted lol)! But it was real tight, closely spaced shirring). As I said earlier, if you want a more relaxed neckline, reduce the number of shirring rows. Shirr both piece of rectangles and you'll get this :
- Pin both pieces, right sides together. Make a mark ½" away from the last shirring row as shown in the photo. Change the bobbin back to regular thread. Then zigzag stitch from top of fabric sides until the last shirring row. Do not extend your stitching beyond the last row. Do this to both left and right sides of the fabric.

- Caution, real bad drawing here lol. I forgot to take photo here. To create the armholes, snip 1/2" at the mark you made in previous step and cutout. To determine the length to cut, you could take measurement from existing clothes or just take the arm-shoulder circumference divided by 2. For Aisha and Hanan, I used standard 4.5" for a close fit. If this is to be worn with t-shirt underneath it should be at least 5". Just a slim curve will do.

Note : It occurred to me that perhaps it is possible for this to be done before shirring the neckline. I've never tried it but if it works for you I'd love to hear it. - Next, stitch narrow hem the armholes all the way round for both sides (the trickiest part for me, this stage).

Align both sides, right sides together and sew the side seams. Press the seams open.

12. Lastly, fold the hem 1/2" twice. Press and stitch close to the edge.

13. Give the garment a final overall pressing, try it on and you're done!


With t-shirt inside...
I'd be really honoured if you'd try this tutorial and would love to see your version. Please email me anytime or drop a line in the comments. Thank you and hugs!!
love it!
ReplyDeletenice tutorial...thank you for the link to shirring
ReplyDeleteThis is great! I have a couple of fabrics that I've been debating what to do with because they are either (A) slinky or (B) quite sheer - this will solve both problems and should be a very cute outfit for my daughter. Thanks for sharing :)
ReplyDeleteThis top looks great! Perfect for our HOT Louisiana weather! I just wished I could get the hang of shirring - I've tried over and over and I just can't do it! It's like I have a shirring block or something.
ReplyDeleteBut I think I want to try again - and make YOUR darling top!!
Thank you so much for posting!
glad you like the tute ladies! would love to see your version & feel free to email me if there's any problem & help me improve the tutorial
ReplyDeleteto Angie - thank you for featuring this in your blog, i'm honoured! i've been an admirer of your creativity for so long, love all your sewing for your cute girl :)
Sheer freaking brilliance! I need to make one. No - I need to make 12!!
ReplyDeleteThanks for linking up at somedaycrafts.blogspot.com so I could find this awesome tutorial. I love it. (wish I would have found it earlier in the season.) I will feature this soon and hope people will still fall in love with it!
ReplyDeletewendy - thank you, can't wait to see those 12 tops lol! :)
ReplyDeletemichelle - i'm honored, thanks! will link back to your awesome blog soon :)
Featured it today! Grab my "featured" button.
ReplyDeleteI love this!! Thanks for sharing. I'll definitely be whipping this up soon!
ReplyDeleteI just found your blog! I love your tutorial! I WILL be trying this. I will post it on my flikr as soon as I finish it. And thank you for the sweet comment on my feliz(I am thatsjennywithaj). It is so nice to hear from other sewers that they like your work. Oh and I just started a blog. If I blog about what I make, I will refer to your tutorial with a link!
ReplyDeleteHi. Tried your shirt tute today and loved it! Thank you...
ReplyDeleteadorable. New follower :)
ReplyDeleteadorable. New follower :)
ReplyDeleteLove this tutorial! How did you finish the bottom of the neckline around the arm openings?
ReplyDeleteI learned a lot from this article
ReplyDelete