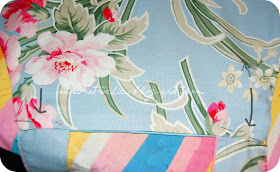
Fabric : Barefoot Roses and Darla by Tanya Whelan, Grand Revival Designs
I consider this simple because I did not make pockets and was able to finish this in an hour. The result is cute and it jazz up a bit the basic full apron pattern. Here's how I make my new ruffled apron :

1. Start with the basic pattern for the body. Use the measurement above and draft. I drafted mine directly on the fabric. Just fold the fabric, right side together and draw the shape using your ruler and fabric marker/chalk on the wrong side. Of course you can also draft it on paper first if you want.

Cut along the drawn line, 1 piece from main fabric. Then take the cut main fabric and pin it to lining fabric as a guide to cut the lining piece.


REMEMBER: This pattern is cut ON FOLD. This means the long side (25" here) lies on folded side of the fabric.

2. Next, cut the ruffle fabric. Cut 1 piece using the measurement above from contrasting fabric. No lining is needed for ruffle.
Now, cut the ties pieces :
Neck = 2 pieces Main Body fabric 2.5" x 20"
2 pieces Ruffle fabric 2.5 " x 20"
Waist = 2 pieces Main Body fabric 2.5" x 24"
2 pieces Ruffle fabric 2.5 " x 24"
3. Take the neck ties main and ruffle fabric, right side together. Stitch 1/4" on both long sides to create a long tube. Turn the tube right side out. Do the same with waist ties. You will have four tubes.
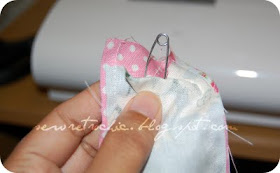
Turning tubes can be a nightmare. Here's how I do it :


Press all four ties. Fold in short end of each ties and press.
4. Now, top stitch the ties using narrow 1/8" stitch, enclosing the raw edge of the short edge of each ties.


zura... seperti biasa I mesti kekaguman dgn your fabric... cantik gilos!... (rock tak akak??)Nak try jugak la your pattern ni...
ReplyDeleteI could still remember my first apron, masa form 1 kelas sains rumah tangga (about 28 yrs ago)... kain pink checked cotton biasa tu... siap buat sulam tangan lagi kat bawah...
tq kak ain, you rawk as usual hehe :)
ReplyDeletefabric tu from my shop, ada lagi if kak ain minat nak beli, just email zura ya? my daughter tanya "Boleh ke kotorkan apron cantik ni masa masak mommy?" hentam jelah lol
zura, gorjes betul apron ni. i pun sayang kalau nak pakai masak sebab cantik sangat.
ReplyDeletebtw, nice tutorial!
tq dura! memang sayang but i need an apron, banyak baju i rosak kena minyak, sambal masa masak hehe...takpe..kotor kalu campak je dalam mesin :D
ReplyDeletebeautiful!
ReplyDeleteAnd THANK YOU for the clear & simple tutorial!
Thank you so much for putting this together. I was planning on making some aprons for Christmas presents.
ReplyDeleteWhat a beautiful apron!!! Thanx for the tutorial!!!
ReplyDeletethank you ladies, glad you like the tute! i would love to see your versions :)
ReplyDeleteI'm so glad you left a comment on my blog, so I could find yours. :) You have so many cute things on here, including two beautiful litte girls. This apron is just what I've been looking for for Christmas gifts. What perfect timing.
ReplyDeletesalam zura,
ReplyDeletethx sebab sudi share this tutorial and saya sudah mencuba but masih kena perbaiki sebabnya saya potong terlalu panjang and dah melebihi paras lutut bila pakai..huhu..
go to this link utk tengok hasilnya..hehe
http://miedacreatives.blogspot.com/2010/02/first-diy-apron.html
thx again.. :)
Hi Lynn! Sorry for not replying earlier! Btw, I think this should work, measure the body accross and divide by 2 + 1 inch for seam allowance. Use that number in place of the 14.5 inches line on the pattern. It helps to draw on paper first also. I really hope that helps! :)
ReplyDeleteHi! Sorry for not replying earlier! Btw, I think this should work, measure the body accross and divide by 2 + 1 inch for seam allowance. Use that number in place of the 14.5 inches line on the pattern. It helps to draw on paper first also. I really hope that helps! :)
ReplyDeleteI have the same question about the plus size apron.
ReplyDeleteLynn
Hi! For a customised body pattern, measure chest & middle area and divide by 2 + 1 inch allowance to get the top and bottom measurement of the pattern (to replace the 4.5" & 14.5" measurement above). I hope that make sense? :)
DeleteHow do I make it for a very large women size 4x
ReplyDeleteHi! For a customised body pattern, measure chest & middle area and divide by 2 + 1 inch allowance to get the top and bottom measurement of the pattern (to replace the 4.5" & 14.5" measurement above). I hope that make sense? :)
DeleteZura, I just found your blog with this pattern and I love it! I'm planning to make aprons for my three sisters and close friends this year for Christmas, and I'm so excited! This is the one! It's good to have early so I can get started and have them done for the holidays early this year! Thank you for sharing your talents and time with us. God bless you and your beautiful family.
ReplyDeleteHi! I'm so happy you found me! I hope the aprons turn out great & your sisters and friends are so lucky!
DeleteIf you finished this in an hour, you are a genius and very fast sewer! I am making one for my mother for her 90th birthday!
ReplyDeleteThat is wonderful! I hope your mum love her new apron! :)
DeleteThanks for showing the safety pin/tube trick. Wow!!! several frustrating minutes or seems like an hour getting the ties turned right side out. Great!!!
ReplyDeleteIt can be torture yes! I'm happy it turns out well in the end for you! :)
DeleteThanks so much for your tutorial. My daughter sold me she wanted aprons for Christmas. It's been years since I made any and thanks to you, it came out wonderful.
ReplyDeleteI often sew a piece of heavy yarn inside of tubes and then pull the yarn to turn tubes right side out. Then just snip the yarn close to the sewn seam.
Hi Kathy! I'm so happy to hear this, thank you for using my tutorial for gift making. I hope your daughter loves her new apron. Oh and thank you for the wonderful tip too!
DeleteI love to wear aprons, and this one is lovely. I am now looking forward to making myself one and also for my daughter and daughter-in-law.
ReplyDeleteThank you for making this beautiful pattern available.
Audreyetta
Hi there I want to make some of these Aprons , if the fabric is thicker do I need to still do a lining
ReplyDeleteReally cute pattern Thankyou
I really enjoy your free patterns, I can't afford to buy patterns so your free patterns are a godsend, thank you!!
ReplyDeleteI was wondering if you had a pattern for easy summer tops.
How much fabric does it take to make the apron
ReplyDeleteThis is simple n cute. Easy, too. Going to use this. Thank u!
ReplyDelete